Contents
1 Outdoor painting benefits
2 Outdoor watercolor painting preparation
3 Outdoor watercolor kit.
4 Where to paint outdoors.
5 Considerations before painting an outdoor scene.
6 When to paint outdoors.
7 What makes a good outdoor scene for painting.
8 How to paint watercolors outdoors
9 Psychological barriers to painting outdoors
10 Final word on painting outdoors
11 Outdoor Watercolor Painting Ebook
1 Outdoor painting benefits
Perhaps one of the first images we have of an “artist” is a man out in nature with an easel painting. In reality very few artists paint outdoors and the image is so cliche that it even feels a little comical to actually contemplate doing that. Aren’t those days gone along with Van Gogh and romantic painting?
Definitely not. Here are some reasons why painting outdoors is beneficial to your art.
1 Improvement
Undoubtedly any painting practice will lead to improvement. But it is just common sense to realize that for a watercolor landscape painter to actually paint landscapes directly rather than from a photograph is going to lead to greater improvement.
As a quality experience outdoor painting is way better than indoor painting and this quality of experience will come out in the painting.
You will also improve because painting outdoors is massively challenging. At first, it may feel like an overwhelming experience. You’ll have the challenge of finding a scene to paint, then selecting the best viewpoint, and then looking at a vast amount of sensory detail and massively simplifying it.
And you’ll have the additional challenges of the weather, passersby and more. Having to contend with all these challenges will make you a better artist. Because the more we are challenged the better our art becomes.
2 Paintings with a magical quality
Many artists will tell you that the paintings you do outside will just have some magical quality that your studio ones don’t have. They capture something of the actual place and moment.
One artist, who was looking at my work, told me that she was very aware of which paintings I had done outdoors.
So there does seem to be some qualitative difference. And although it’s true that you can do amazing things in the studio, really slick and experimental stuff, the paintings done outdoors just have a touch of life and magic you can’t get in the studio.
3 Enjoyment, healing and connection to nature
Okay, sometimes it’s really terrible painting outdoors – freezing cold, boiling hot, mosquitoes etc. But with some good thinking (e.g. let’s go painting on a nice sunny day) and planning (e.g. let’s take some insect repellent and find a place with some nearby shade or out of the wind), painting outdoors can be one of the most amazingly satisfying experiences you can have.
That direct immersion in nature, the sun on your face, the wind in your hair, looking at a really beautiful landscape – it’s healing. There is a feeling of being connected to nature and a feeling of space and freedom that gives you a natural high.
And I believe that this wonderful state must lead to better paintings.
4 Adventure and amazing experiences
Getting up early in the morning. Driving into the countryside. Not knowing what will happen. It’s an adventure and many of us in our boxed lives where we spend too much time in the same place, staring at screens, desperately need some outdoor adventures.
And I’ve had some amazing experiences. I’ve seen beautiful sunsets, dramatic stormy skies, early misty morning scenes and more. I’ve had strange experiences such as seeing a pigeon lay an egg right next to my foot. And pleasant experiences such as receiving a jar of homemade honey from a farmer.
I’ve even had the wonderful experience of selling a painting on the spot. And I’ve had fortuitous experiences such as meeting a man who connected me with another man who now let’s me exhibit my paintings at his cafe. And another fortuitous experience was meeting a man who later bought a painting from me for $1000.
Things happen when you go out into the world. Perhaps not as much as you would like, but they do happen.
5 Inspiration
You’ll see things you never expected that will inspire you to paint and will often lead to great paintings. For instance, I saw the sun come out after the rain and it was an amazing scene of dazzling light and mist that I would never have experienced if I had just been at home in the studio. This painting later won a prize.

Although that was an exceptional moment there are numerous occasions when I’ve seen a beautiful sky or an interesting place and have felt inspired to paint – such paintings tend to be better than the ones done in the studio.
6 Resources
Although you might be going to one place to paint one scene it’s very likely that you’ll see on the way there other scenes to paint or you’ll get creative ideas just from looking around.
All of which can become resources for future paintings – and which you should find a way of collecting in a journal, as photos or as sketches.
I went to a tourist town to do sketches of rickshaws but during my trip I saw a beautiful river scene which led to a series of paintings – below is one of them.

As a result of all the journal ideas, photos and sketches, I am never at a loss for a scene to paint.
7 Satisfaction
Finally, it is challenging and you will fail a lot. And especially when you paint outdoors you will experience far more challenges than in the studio. But then one of those paintings will work and the feeling of overcoming all those challenges to produce a good painting will give you an incredible feeling of satisfaction. You will feel like you did something almost heroic – and you did.
2 Outdoor Watercolor Painting Preparation
It is very important to be prepared when you paint outdoors especially if you are travelling into the countryside or remote places. Before you think about art materials you need to think about safety and comfort – otherwise you could have a hard time and even get into real trouble.
1 Always tell somebody where you are going
If you are going to paint in the countryside and you are a city person then you have to realize that you are out of your depth. Always let somebody know where you are going (even roughly if you don’t have a precise destination) just in case you have an accident.
Trust me, it really can happen! I got stuck on a mountain all night and nobody knew where I was. Here is a painting I did of myself walking down the mountain at evening time. I was totally unaware how quickly it would become pitch black before I get to the bottom.

2 Always take a cell phone and a flashlight
A cell phone can be used for emergency calls. Although in some countryside areas you might have no signal. Also a cell phone is good as a light – in fact I would recommend taking a torch too.
I got stuck on the mountain because it got pitch black and without any light I couldn’t find the path down. It was pretty terrifying. Also the path was very rocky with sudden drops, so one fall and I could have broken a bone or worse.
3 Have the right clothes
Long pants are probably a good idea. There are things in the grass, which often you can’t even see, that bite and it can be serious. Where I live, all the farmers cover almost every part of their skin and I think that it is always good to copy the natives as they know the environment better than me.
4 Protection from the elements.
In summer have a hat and wear a long-sleeved top. It’s so easy to get seriously sunburnt – especially if you spend a lot of time indoors. Sunglasses can also be useful as you can get glare from your white paper – but remember the glasses are tinted so your colors might be off. An alternative is to shade your paper using the cover of the pad (if you use a pad).
Have a light waterproof coat to protect you from wind chill and from rain and getting too cold.
And know that in spring or autumn it can start very cold and become uncomfortably hot in the afternoon – at least this is my experience from painting outdoors in Japan. The fewer layers you wear the better as the less you have to undress – so pick the right gear e.g. light-weight thermtech clothing.
5 Water and food
Avoid dehydration especially in hot places and have some food. It’s hard to paint when your stomach feels tight with emptiness.
Preparation 10 Point Checklist
| Points | Items |
| 1 | Tell somebody where you are going (most important point). |
| 2 | Take a cellphone. |
| 3 | Take a flashlight. |
| 4 | Lightweight waterproof coat. |
| 5 | Wide-brimmed hat and sunglasses. |
| 6 | Water and food (include an energy bar or some cake with butter in it). |
| 7 | Long sleeves, long pants, boots. (You might want sunscreen and insect repellent too but personally I use neither). |
| 8 | Light-weight thermtech clothes. (You need in fall, winter and spring – and possibly even in summer). |
| 9 | Cash. |
| 10 | Painting equipment. (I will cover this in part 3). |
3 Outdoor Watercolor Kit
The most important rule is to travel light. So have the minimum of everything e.g. just 3 brushes, just 1 or 2 smallish pads. And try to have everything fit in one bag.
Materials List (15 Items)
At the bottom of this list is a downloadable PDF checklist so you can tick off the following list of materials. Some of these items include art materials that I urge you to buy from an art store. But most of the items you can buy from a big supermarket.
1 Brushes
Sometimes I use only 3 brushes. The Hake, the bamboo and the liner. But I also use a round brush and a mop. That’s 5 brushes in all and I think 5 will be nearly all you ever need. Here are some details about each brush:
Hake
This brush is great. It’s cheap, it’s tough and it will stop you fiddling and make you a bold painter – watercolor is all about painting boldly. This is my main man, he’s not very friendly at first but with time you’ll really get to like this brush. He’ll be good for you.
In my “1 Brush Method” course I show watercolor beginners how to paint 10 different scenes using this one brush and also just one color. Click here to learn more.
Liner
This is wonderful for power lines, ripples in the sea and so many other things. In my “2 Brush Method” course I show watercolor beginners how to paint 10 different scenes with a hake and a liner brush. Click here to learn more.
Bamboo
I rank these higher than a small round brush because their rough hair gives them much greater expressiveness than a normal round brush. If you ever compare them you’ll see what I mean.
Small round brush
This brush is good for details like small figures. Although you can paint figures with your bamboo brush a small round brush gives neater edges. The reason I rate a bamboo brush as higher than a round brush is that it is capable of producing a lot more different kinds of marks such as super thin lines and very rough, shaggy edges. But there are times when you just want a super nice clean line and in that case you want the small round brush.
Mop
Hold off buying this one. It’s a beautiful brush but you don’t really need it and they are expensive. To begin with, you can use the hake instead of this or a big round brush.
2 Water bucket
For outdoor painting I like the small folded art buckets that you can pull up to make them deeper. If you are using an easel you’ll want a bucket with a handle so you can tie it to your easel with some string.
In the studio I use a big bucket (which I recommend – especially if you are standing up) but outdoors I want something smaller and lighter.
3 Paints
I use a minimum of paints. I categorise them as browns, blues and brights (or colorfuls) and then white.
Below is a list of the paints I personally use.
Browns | Yellow Ochre, Burnt sienna, Burnt Umber |
Blues | Phthalo blue (red shade), Cerulean blue (little expensive) |
Brights | Alizarin Crimson, Pyrrole Red |
White! | Titanium white |
Please note that this selection is not necessarily the best choice for you. For instance, I choose Pyrrole Red not so much because it’s a great red but because it isn’t poisonous. Cadmium Red, which is poisonous, might be a better choice for you. And many artists use Ultramarine blue but I use Phthalo Blue because it is so powerful and gives me strong darks.
Also the last paint I include is white. Pure watercolor artists don’t believe in using white. However, I don’t subscribe to the “pure white paper only” club – although I respect them.
And a final point is that I use Holbein because like many Japanese products they are great quality and very cheap compared to any other good brands.
4 Palette
I recommend a plastic one with a cover. It doesn’t need lots of spaces for paint but it needs several deep wells. The reason I like a palette with a lid is that I don’t have to clean it after I finish painting. I can put some damp tissue in there that keeps the paint moist so that I can use it again.
I used to always use a folding metal palette but they get very hot on a sunny day and easily get dented.
5 Water container
To hold your water for painting. You can use a 1 or a 2 liter plastic bottle.
6 Paper
I recommend a spiral bound watercolor pad. I will give my reasons in a future blog post.
I would recommend a small F4 size pad (24 x 34 cm approx = 9.4” x 13”) Note: it doesn’t have to be exactly this size but just the nearest choice.
I don’t use a big pad when I’m painting outdoors because it’s tiring to carry around and conspicuous. A small pad should easily be able to fit it into a backpack with all your other materials.
Also, if your pad is too big and the wind gets underneath it then your pad can fly away or whack you in the face. It happened to me and it really hurt – it was also pretty embarrassing.
Sketchbook
I would also recommend a sketchbook for quick sketches. I use a multimedia pad which is super cheap compared to watercolor pads and I have even produced beautiful, finished watercolor paintings on such paper that I would have no hesitation about selling. It’s super useful to have such a pad.
Note the torn surface of the paper at the bottom about half-way across. I rubbed on the paper with my brush and it tore the surface. This would not happen with good quality watercolor paper.
But if you are not too aggressive with the paper (and don’t soak it with a lot of water as it will warp) then you can produce paintings good enough to frame on it.
I use a spiral bound multimedia pad that is acid free.
7 Two Clips
They are for holding down the watercolor paper whilst painting – if that is you are using a spiral bound pad.
8 Rag / cloth
This is for wiping your brush on. I buy cleaning cloths from a super cheap shop in Japan called Daiso.
9 Tissue
They are so useful. Don’t skimp on them.
10 Spray bottle
A spray bottle is essential for stopping the paint on your paper drying out too quickly and thus becoming unworkable. It can also be used to create texture.
11 Clutch pencil and pen
I use a technical pencil with a thick lead that doesn’t break easily. Having such a pencil saves me a lot of time as I never have to sharpen it and it always has a sharp point so it is always going to give me a nice mark. I only use a technical pencil though when I am doing finished painting.
When I do sketches I use a pen because it doesn’t smudge and I even use a pen with some of my finished paintings.
12 Kneaded eraser
If you want to get an eraser then I recommend a kneaded eraser as it doesn’t damage the surface of the paper.
13 Backpack
The best way to carry your materials is in a backpack. I use a fairly big backpack that is meant for camping. It has lots of pockets on the outside that can hold bottles, torches and so on – it’s super useful.
14 Easel
Easels are a little expensive and will make you stick out so perhaps hold off on buying one. Remember you can also use them in the studio so they are useful. I now have 3 so watch out you don’t develop an addiction for buying them.
The alternative is to get a camping chair and just sit and paint – you’ll look less conspicuous and save some money.
Finally, you could just sit on the ground which is what I sometimes do.
Note: If you do buy an easel it is essential that it is a watercolor easel which means that it can tilt. Be careful you don’t buy an oil painting easel which normally can’t tilt. Watercolor paintings are normally done with the paper tilted at an angle as it allows the water to run down the paper when you are doing washes. This angle though is normally never as steep as 90 degrees as the water would run down too fast. Whereas, oil paintings are normally done with the canvas at a 90 degree angle.
Whoops! I forgot one item.
15 Brush container
I couldn’t find anything like what I use at Dickblick online art store.
So just use a plastic bag – it will be fine. Just don’t leave your brushes in the bag after painting as they need exposure to air so they can dry out.
If your brushes stay wet too long they might get moldy depending on the climate. I had one student whose Hake brush actually turned green with mold – this is in Japan where it gets very humid.
4 Where to paint outdoors
You might be wondering where you can paint. It’s not as difficult as you may think. The more you look for scenes to paint the more you will start to develop, albeit slowly perhaps, an eye for scenes that will likely lead to good paintings.
1 Locally
Look around your neighborhood, you may well be surprised at what you find. For instance, I found this temple gate about 300 meters from my door. Okay I live in Japan so you might not have a temple, but it could be a church.

Even a cluster of ordinary buildings in the right light can look amazing. Such as in the scene below. This place is about 400 meters from my house. It’s quite an ugly scene in normal light. However, what you’re painting is not really the place but light and shapes.

And this is another local scene near my daughter’s kindergarten. Once again, nothing could be more ordinary than this picture but with the right light and composition of shapes the ordinary can become extraordinary.

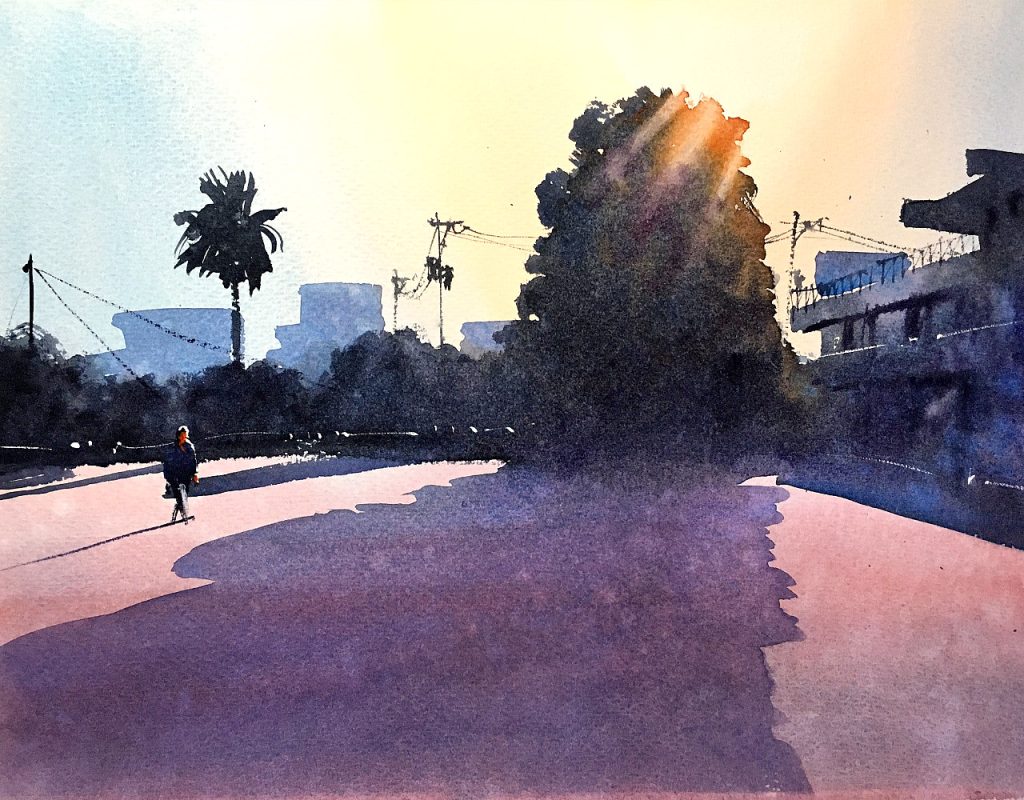
2 The City
Walking or cycling around the city (especially if you live in a city) is also a great source for scenes to paint. Cars, roads, signs, power lines, utility poles and so on as well as high rise buildings all make for really interesting scenes that can easily become dramatic paintings.
I love painting urban scenes and I find them much easier than countryside scenes. This is because all the lines you see in a city scene help to connect your painting and nothing leads the eye into a painting better than a road or path going off into the distance. Below is one of my city paintings.

3 Bicycle ventures
If you’ve got a bicycle then you now have access to many more places beyond your local area. I have a river about 500 meters from my house and the river path has allowed me, with the help of my bicycle, easy access to the sea and the countryside.
I’ve had many great outdoor painting adventures deep in the Japanese countryside that began with cycling along this river path.
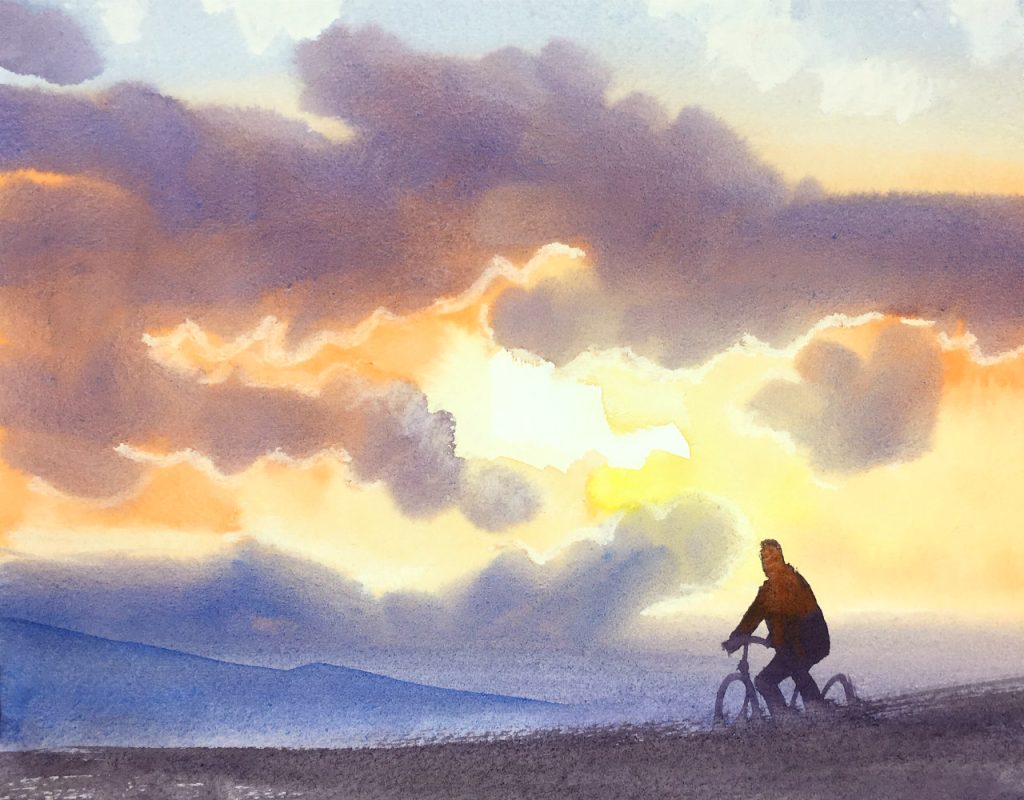
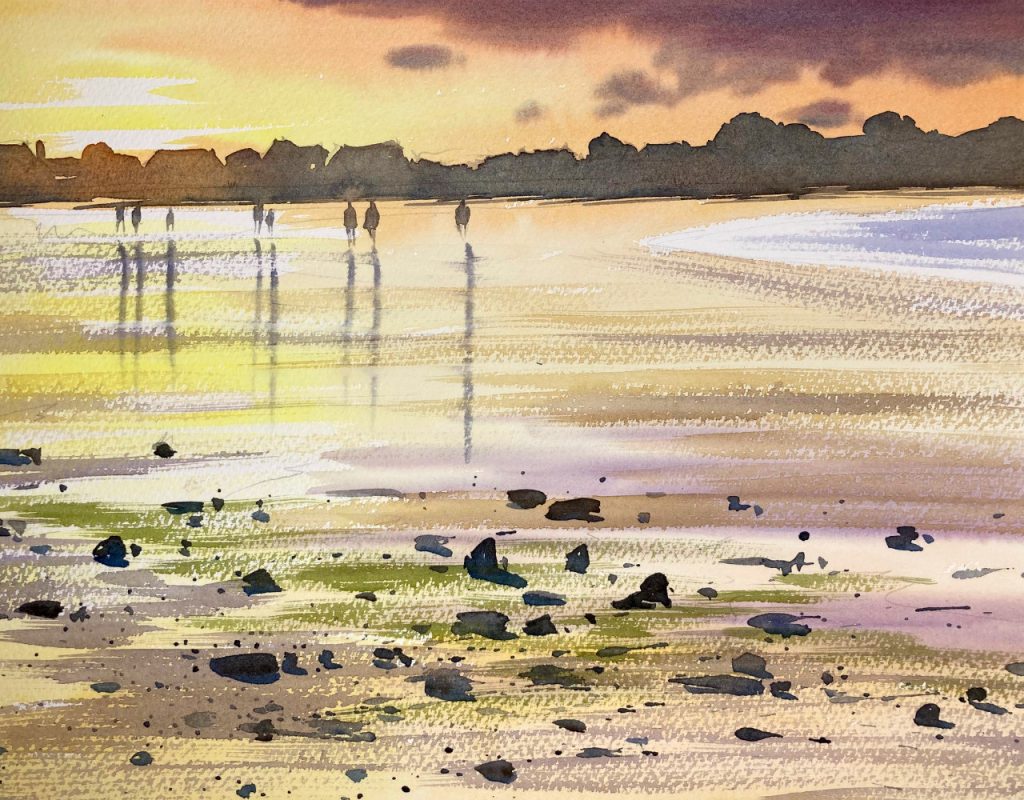
I’ve also cycled to the sea via this river path where I have painted many breath-taking sunsets over the bay. Below is one example.

4 Family trips
I have found many beautiful places from family trips. Yes, you might not be given the chance to paint but you can take a photo of the scene or do a quick sketch. Below is a painting of a place called Sasebo in Nagasaki prefecture.
We went there on a family trip. It was my wife who chose this place which I had never seen before and had known nothing about. We only stayed there one night but it is now one of my most beloved places in Japan.
That one time experience along with the photos I took has led to a long and ongoing series of paintings of that place. Below is one example.
5 Internet search and ask people
Use the internet to search for interesting or beautiful places in your region. Also ask friends if they know any interesting or beautiful places. My students often tell me of beautiful places they have visited.
6 Driving around
And finally just get in the car and drive into the countryside and take any route you fancy. Or decide on a place but be willing to change your route if you see anything that catches your eye. Below is a painting of one of those scenes that caught my eye many times while driving – and it was also right next to the road.

Although I thought this scene would make a good painting it was quite a while before I actually did a painting of it.
It’s also good to take notice of signs – no matter how small. On one trip I saw a little sign for a waterfall and although I thought I would be disappointed it turned out to be an amazing waterfall. Below is one of the paintings I did of that waterfall.

And if you see a beautiful scene on the way to your intended destination I would always suggest that you stop and paint it. One year I intended to go to a picturesque tourist town called Yufuin but I kept seeing an interesting scene on the way that made me stop and get out and paint. This happened about 5 or 6 times. Below is one of the scenes that caught my eye and made me stop and paint.

Note: This is just a little warning to overly zealous artists, such as myself, when driving. It is very important if you find yourself looking a lot at the scenery around you while driving to keep bringing your eyes back to the road. In the past, I have often been veering off the road because my eyes were constantly looking around me for a scene to paint.
It is much better to keep your artist’s eye on the things that are ahead of you and not to the side or behind.
And if something really catches your eye then look for a place to stop. If there isn’t a place to stop then, when you can safely do it, turn around and go back to the scene – as you are returning remember to keep looking for a safe place to park.

The painting above is of a river in Kitsuki, Oita prefecture. This river scene caught my eye while driving home late one evening. I was so captivated by it that I turned the car around, drove back and took a photo. It took a lot of effort to paint the picture but I’m happy with this final painting. I really wanted to capture that lovely orange and blue light on the river surface.
Also be open to the unconventional. On one driving trip I went through this tunnel and it was so interesting that I took a photo and later turned it into a painting. It’s not what you would normally consider a subject for a painting but I think it works.

5 Considerations before painting an outdoor scene
Viewpoint and a quick sketch
So you think you’ve found your scene. But it’s a good idea to look all around. Is that the best view point? Try viewing your scene from slightly different positions just to make sure you’ve got the best view.
It’s good practice to do a super rough sketch to see what the basic composition of your painting looks like before you commit time and effort into doing a full painting. Ironically, these sketches can end up being better than the final painting!

Please note that despite giving you this advice I still tend to go for the final painting. So I’m a bit of a hypocrite and I hope that I start taking my own advice!
Time
You have to consider how much time you’ll have to paint your subject. An important example of this is painting a sunset scene. You’ll find that as the sun gets lower it seems to move quicker. So it is easier to paint the sunset early on rather than later on. However, sunsets get more and more beautiful until, if you’re lucky, you get that final and fleeting glow when the whole sky lights up.
If you want to capture the sunset near the end or at that final glow stage then you’ll need to take a photograph as you probably won’t have enough time to paint it.
Also don’t forget about the movement and changing shape of shadows. At the beginning of a sunrise and at the end of a sunset the shadows will start to rapidly move and change shape.
So try to remember the original shadows (you can simply draw them on your paper) and stick to that rather than how the scene might look when you are coming to the end of your painting.
Because shadows are normally painted last of all there does tend to be a significant amount of time lapse in which the actual shadows have moved and changed shape. The painting below was done at evening time and shows just how extreme shadow shapes can become.
Weather
And you have to consider the weather. Is there a chance of rain and what will you do if it does rain? Will it get scorching hot and is there shade nearby or will you bear it out? Is it an exposed and windy place that will keep making your pad lift up suddenly? You might need to attach your bag to your easel to stop it falling over.
Other inconveniences
It’s important to consider if you are going to get a lot of passersby and how you will deal with that. You might be painting on a country road with no traffic on it but if a vehicle comes can you get out of the way fairly quickly. It’s important to think about potential problems so you are prepared.
Terrain
Mountains
Don’t go to the top of a mountain with all your gear. Yes, I did – including my easel. It’s okay but it’s much easier to take a sketchbook and 3 colors and 3 brushes and no easel – you’ll still be able to paint a great picture.

And, of course, take a camera or a cell phone for getting an image. Always take a photo of the scene you paint so you can improve your painting or have another go in the studio.
Also you don’t even have to go all the way up the mountain. This is a painting I did on the mountain slope.
And remember that if you stay too long on the mountain top to paint a sunset it can become pitch black and difficult to find your way down without a torch – be super careful. As I’ve already mentioned, I got stuck on a mountain all night and it wasn’t fun.
Also be careful about standing on ledges to take some perfect shot. A famous Japanese animation artist died doing exactly that. In his enthusiasm to get some fantastic shot he leaned over a little too far. I think this can be a temptation for the overly zealous artist, such as myself, who is always on the prowl for an outstanding scene to paint.
Sea
If you are painting a sunset over the sea, remember that there is that final glow that always comes later than you expect when the whole sky lights up. It doesn’t always happen but when it does it is spectacular.
It’s probably, as I mentioned before, too difficult to paint so a photo might be the best choice. Although if you do the whole painting without a drying stage it is possible. I have done this on several occasions and sometimes it goes horribly messy but sometimes it looks good.
Also because of the exposure there is a high chance of windy weather so it’s good practice to have a smallish pad that is firmly attached to your easel and for your easel to be weighed down with something heavy such as your painting backpack, water bottle or even a rock.

Rivers
When it starts to get warm you can get swarms of flies by rivers that make it impossible to paint – unless it’s a cool mountain river – the painting below is of one such river. Even in the middle of a hot Japanese summer this place is wonderfully cool and without flies. Also watch out for snakes by rivers especially where you get reeds.

Farms
When you climb over a fence remember that there could be bulls around. I climbed over a fence to paint the scene below but I didn’t realize that there were bulls in this field. They were quite far away but it was still a little alarming.

And sometimes you get angry farmers. I’ve only experienced this once but it can happen. Most farmers in Japan I’ve found to be friendly and even generous.
6 When to paint outdoors
Sunrises and sunsets
Sunrises and sunsets are often the best times to paint a picture because you get beautiful, colorful skies and dramatic shadows. So it really is a good idea to paint very early in the morning and also around sunset time. And even after the sunset the sky can look beautiful. As I hope the painting below shows.

Painting in bad weather
Although sunny days are normally the best occasion for painting outdoors because of the shadows you get, bad weather can also be good for painting as you can get dramatic and beautiful light effects.
In 2018, I was driving through a national park on a bleak cloudy day when suddenly the sun burst out. It was breathtaking. And led to the painting below.
On another occasion it had been raining all day when suddenly it stopped and the sun came out like a fire in the sky and the whole scene was transformed in the blink of an eye. That led to the painting below.
And cloudy skies – especially dramatic ones – can be beautiful to paint – such as the one below.

Painting in the rain
I rarely paint in the rain. I’ve done it a few times and I find it uncomfortable and annoying. Of course, you could use a large umbrella providing it’s not windy.
However, I love rainy scenes and I’ve done many paintings of rainy scenes. Rather than paint in the rain, I walk around in the rain, especially at night, taking photos of roads or Japanese festivals. Below are some examples of what I later did in the studio from these walks in the rain


7 What makes a good outdoor scene for painting e.g. is paint-worthy
Artist’s eye
The most essential quality for making a good painting when you go outdoors is having an “artist’s eye”. An “artist’s eye” means the ability to see scenes that will make good paintings.
Sadly, I have to say, from my own experience, that it takes years to develop “an artist’s eye”.
Initially, my outdoor painting ventures started with bicycle trips.
I spent whole days cycling into the countryside hoping the next scene around the bend would be that perfect scene – it almost never was!
And I probably did everything wrong in developing an artist’s eye.
Firstly, I didn’t do quick pen or watercolor sketches of scenes in which I played with the elements of composition, tone, color and so on. I just painted a finished painting which most often turned out to be disappointing.
It took me hours of practice in the studio to develop an artist’s eye.
And I’ve found that doing lots of quick watercolor sketches of real scenes, photos or just ideas in your head will make you better in a shorter time than trying to always do a complete painting.
Also, looking at the work of other watercolor artists will help you – especially if you like their work. Make a point of looking at their compositions and remembering them.
The reason I suggest you look at other artists’ compositions is because the most important element in landscape painting is the composition.
Developing an artist’s eye is first and foremost a feeling for what makes a good composition. Composition is essentially the arrangement of shapes and lines and a good composition is when those shapes and lines connect in a way that is aesthetically pleasing.
Below you can see some sketches I did where I play with the horizon and the position of the sun and even a little with the figures. It’s good to do sketches like this in which you play around with the composition.

Beginners especially want to focus upon composition. Because until you have a good composition you’ll have no chance of creating a good painting – no matter how good the other elements of your painting are. One of the best books I’ve found on this subject, and which I strongly recommend, is Edgar A. Whitney’s Complete Guide to Watercolor Painting.
Composition
Here is a rough guide on the essentials of a good composition. Ironically, you can break all of these guidelines and still make a good painting. But I think having a knowledge of these guidelines will help you tremendously.
1 Horizon line
Have an idea where the horizon line is. Here’s a simple video I did about deciding on your horizon line. Basically a low horizon line means the emphasis is on the sky. A high horizon line means the emphasis is on the ground.
Before you begin to paint, or even draw, make sure you’ve decided if you will have a low or high horizon line. It might be a good idea to put a pencil line where it is.
I wouldn’t recommend a horizon line in the middle. It can work but it’s harder to pull off a good painting in my opinion.
Below is an example of the high and low horizon positions. I couldn’t find any paintings where I had a middle horizon line.

2 Three layers of perspective and tone
A good composition has three layers which are the background, the midground and the foreground. All 3 are not essential but having all 3 will massively increase your chances of having an interesting painting.
Below is an example of a painting with a background, a midground and a foreground. In the background you have the pale blue mountain. In the midground you have the distant trees on the river bank. And in the foreground you have the big trees on either side of the river.
Generally speaking, things in the distance are bluer and paler and things that are nearer are warmer (e.g. redder) and more intense. And if you look at the painting above you will see the change in color from a bluish color to a redder color, and also an increase in pigment thickness, as you go from the watery mix of the background to the much thicker mix of the foreground.
This change in color and intensity is what we call tone. And the way we create 3 perspective layers is by having the right tone.
After composition, tone is the second most important element in watercolor painting and one that most beginners fail at. I see so many beginner watercolor artists who want to use color and paint pretty pictures but have no tonal range in their paintings. As a result, these paintings for all their prettiness appear limp because there is no depth – in other words, no perspective.
Look at the painting below. It has almost no color in it but it is very powerful. That power comes from having the correct tonal values. It’s actually much easier to paint pictures with a few colors than a lot because once you add color you have to consider the tone of each color.
That’s why in my One Brush Method course we use just one color and focus on getting the tones right. Please get good at doing tonal paintings before you go off and experiment with all those beautiful colors.
3 Focal point.
There needs to be one spot in the painting that is the center of the whole painting. In the painting below for instance it was the cows. Having a focal point really makes a painting better. Normally the best place for a focal point is in one of the corners of the painting.
However, you can sometimes have multiple focal points or even, as in the painting below, have no real focal point but still have quite a nice painting. And this is also a painting that somebody bought.


4 Direction and covert arrows
This is related to the focal point. It is essential to have lines and shapes leading the eye to your focal point. This is one reason why man-made scenes are easier to paint than natural scenes.
For instance, a road or a path in a picture naturally acts like a covert arrow that leads the eye along the road or path to an object such as a figure or a car which will become your focal point. In the painting below, you can see how the path leads us to the figures on the path.

The pattern of the clouds, lines, buildings, fences and basically all manner of elements in your painting can be covertly used as arrows that direct the viewer’s eye to your focal point.
Basically you just need a shape that starts large and becomes narrower, like an arrow, and that ends up pointing right at, or roughly in the direction of, your focal point.
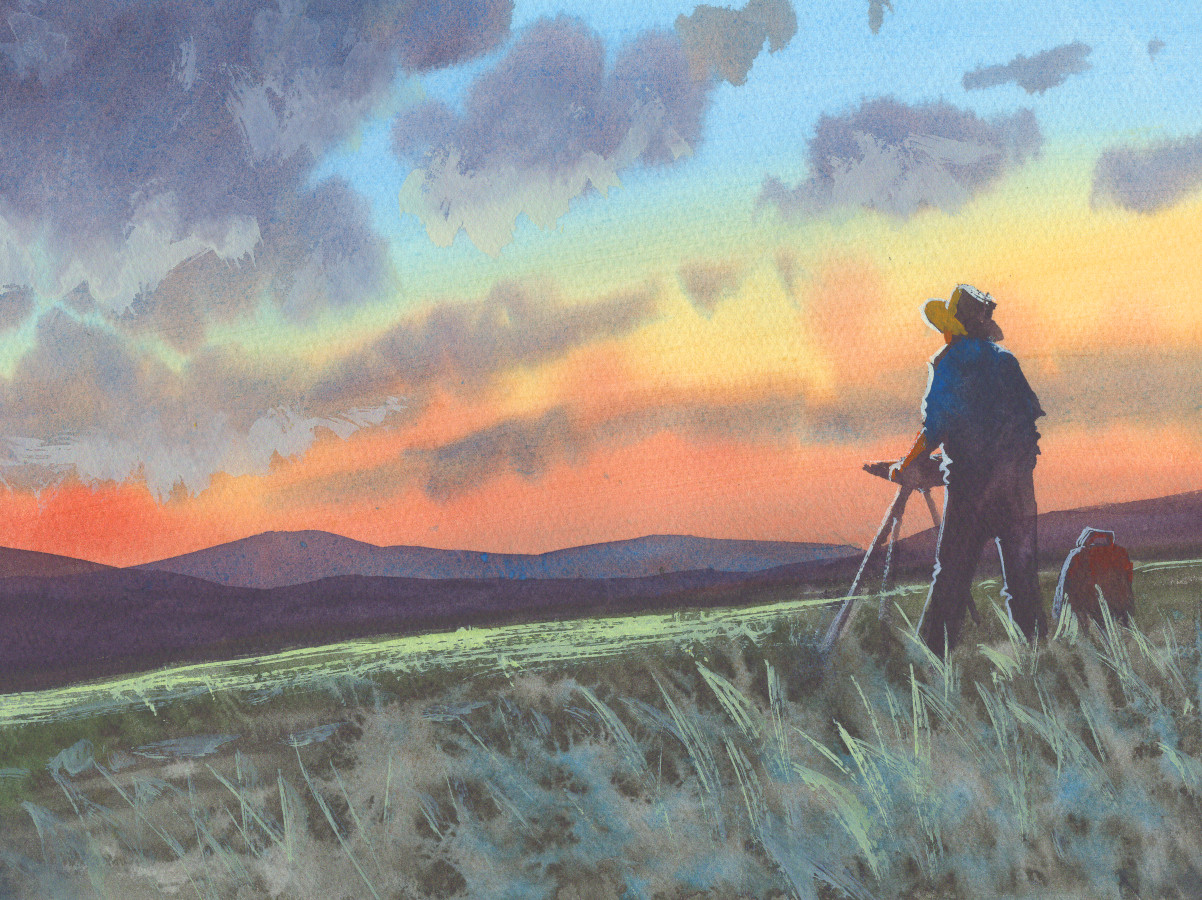
In the painting below I have drawn these covert arrows, such as the angle of the mountain ridges, the shadows in the fields, the blue patch of sky and the path. All of these elements act as arrows directing the viewer’s eye to the trekker with the red backpack.
The arrows don’t always point straight at the trekker but as long as they point roughly towards him then they will lead the eye towards him. If all of the arrows pointed directly at the trekker it might feel contrived and unnatural.

If you look at good paintings you’ll start to see these covert arrows that are directing your eye towards the focal point. This is especially true of landscape paintings.
5 Good contrast
You also need a strong contrast especially around the focal point. In the picture below of the white boats you can see I set a very strong dark background behind them. I exaggerated the darkness to make those boats really pop out.

6 Unity
You need the shapes in the painting to join together through the use of power lines, shadows and so on. I often paint facing the sun because it allows me to merge all the colors into one dark shadow, basically a silhouette, with subtle suggestions of color.
Consider the image below for instance. It works well. Why is this? In my opinion it is because all the buildings merge into one another and that unity creates a very strong painting.
Using fewer colors also creates great unity in a painting and is a further reason for not using lots of colors.

7 Simplification
Unity leads to simplification. And it’s essential to remove too many separate objects in your painting. So decide what you must include and what is superfluous.
I think the simpler watercolor paintings tend to be the best. And it always surprises me how simple you can make a watercolor painting. Below is one of my simplest paintings.
I think snow scenes, such as the one below, are particularly effective when they are simplified to the bare essentials.


You don’t have to, but I think it is a good experiment to try at times to have a Zen-like minimalism in your paintings. They will become shockingly powerful.
8 Modify
As well as eliminating objects also modify the ones you do keep. For instance, if you are painting a tree put it where it will look best in the picture. Also, make it smaller if it is too big. And if it is not such a nice looking tree then make it nicer by copying another tree that you can see that looks nicer or by using your imagination.
In other words, don’t slavishly copy what is in front of you. Alter and modify things as it is the image that is the most important thing – at least that is my philosophical stance. Some artists believe that an accurate copy is the most important thing; if you believe that then you should follow that philosophy.
Generally, I do try to be fairly faithful to the scene I paint but I will modify things to make a better looking painting and I will exaggerate and so on in order to express a certain feeling or vision about a particular place.


In the painting above of a road crossing, I changed a lot of things as you can see when you compare it to the original photograph. I made a lighter, more colorful picture. I had the building on the right hand side glowing a warm orange color. And I added several figures crossing the road rather than just the one that you see in the original photograph.
9 Visualize
Finally, if you can it helps to visualize roughly how you would like the painting to look before you begin painting. It can be difficult to do and perhaps it just comes best naturally without premeditation but I’ve always found that those paintings that I’ve seen like a vision in my head before I begin painting tend to come out really well.
The more you paint and look at scenes the more you’ll start to have a creative muse in your head that sends you visual ideas – don’t ignore this muse; always be willing to go along with its ideas as this is where your living creative genius lies.
Also, when you do visualize what the final painting will look like you will likely have a good idea what the most important aspect of the painting is, as a result, you’ll be more focused on getting that aspect right which will likely lead to a better painting.
Many times when I have done an unplanned painting with no main focal point or main feature such as a building or a particular kind of lighting or shadow effect it will fail.

8 How to paint watercolors outdoors
1 Paint a sketch not a masterpiece
So you are ready to paint and no doubt want to do a full painting that if it succeeded you could frame and hang on your wall. But I would encourage you not to aim for a masterpiece or a nicely finished painting. Instead, do a watercolor sketch and aim to capture one thing correctly such as the focal point or the atmosphere.
A quick pencil sketch or even a pen sketch with some washes is a good way to begin painting. Or don’t even use a pencil or pen but begin straight away with the paint brush.
Consider, for instance, the paintings of the shrine below. I first did a very loose sketch which was all done in one go with no drying time, and I focused on just the shrine and the benches in front of it. I ignored the trees behind and many other details.
Later I did a proper painting but I learnt so much from doing the loose sketch. And I feel that the first loose sketch is better than the finished painting.


2 Relax
Often the more relaxed and easy going you are with your outdoor painting the better it will be – it will often beat your more careful paintings because it’s got something a bit untamed in it and flowing – and it really shows. This is really a repeat of my argument for sketching versus trying to paint a complete painting. For some reason a touch of casualness in painting leads to good results.
3 Take a photo
Remember to take a photo as a reference so you can paint the picture again. I often paint the same scene again and again. I now have favorite haunts that I often return to – such as this river scene below. And you can, of course, paint them in the studio using your photograph as well as your painting and your actual experience.

4 Paint the same scene many times
For massive improvement paint the same scene many times. Firstly, though, find a place or a particular scene that you love. And just paint it again and again. This should be easy to do if you really love that place or particular scene.
One example I’ve already mentioned is my trip to Sasebo. The place was so beautiful that I’ve done numerous paintings from that one day at Sasebo.
I’ve also found a good scene and done a series of paintings of that particular scene. In each new painting I play around with different elements of the painting such as the arrangement of trees and figures, as well as colors and so on. This is a good way to improve your artistic abilities. One example is the stony path below. I did many paintings of this one path with lots of different variations.


9 Psychological barriers to painting outdoors
1 Self-conscious
There are some obvious reasons why people don’t paint outside.
Firstly you don’t want to stick out and get too much attention. The answer to this is to not use an easel but just a small sketchbook.
You can also sketch with a friend or group of people.
And you can also paint in remote places in the countryside. But if you are a woman do be careful. Where I live, a woman was murdered by a man in a remote place. She was going to a famous spa in the countryside. It’s a very rare thing but it can happen.
You can also draw or paint from your car with all the windows up.
2 Confrontations
Sooner or later you will have to get used to people looking at your work and commenting. This is especially true when you go outdoors. I have encountered all kinds of people while painting outside.
Some people are friendly. Some people are complimentary. Some people insult you but in a very indirect way – such as one woman who told me she could see the pencil lines in my picture. I didn’t know why she said this but I think she was being critical – who knows.
Then there is the ghoul. They stand behind you and say nothing. You can feel their silent presence and you feel a kind of coldness and then after staying too long they go without a word.
And one of my favorites is the life-story person. They just come and tell you about their life. I actually find these types very interesting.
And there is the generous person who gives you something. And, if you are really lucky, the buyer.
I recommend that you always treat passersby politely and see it as good training in being a polite, sociable person – which is an essential skill to have in life but difficult to master. But don’t allow people to distract you too much from painting unless you enjoy it.
3 No time or family responsibilities
In that case take a small sketchbook with you when you go to a cafe, restaurant or are on a family trip. Be careful though. Train yourself not to stare at people. Instead get good at looking at a scene or a person in a short glance and then draw them from your visual memory. It’s good practice. Below is a painting I did from a photo taken in a cafe.

Also, sketch people who are really busy doing something or have their back to you as they are far less likely to be bothered by your activity. Develop your skills of discernment. There are some people who are hyper self-conscious and seem to think the whole world is watching them (and out to get them) when nobody even notices them!
And if that is too difficult for you then I also take my sketchbook and do drawings from my cell phone photos. If you are in a cafe you can take a quick photo of the scene (as if you were going to post it to FB and say what a great cafe it is) and then use this picture for your sketch.
You can even paint at home. Here is a painting of my wife sleeping while holding our daughter.

10 Summary on outdoor watercolor painting
1 Be prepared but light-weight.
2 Develop an artist’s eye for paint-worthy scenes.
3 Think: first composition, second tone and third color.
4 Paint a loose sketch not a masterpiece.
5 Be polite and have fun.
6 Remember: every time you paint your inner living creativity grows.
11 Outdoor Watercolor Painting eBook
You can download this article as an eBook, it includes all the pictures used here. You will also get a checklist of all the materials you need for outdoor watercolor painting at the end of the eBook and also the a 10 point preparation checklist. Use the papal button below to purchase both items for $10.
12 Outdoor watercolor painting video series
In this video series I give a simplified talk about outdoor watercolor painting. If this is useful then please like the video.
Part 1: Benefits of Painting Outdoors
Part 2: Preparation for Outdoor Watercolor Painting
Includes about 8 paintings of Mt Yufudake, the mountain I got stuck on for a whole night.
Part 3: Outdoor Watercolor Kit
Includes about 8 watercolor landscape paintings done with just 3 brushes and 3 colors.
Part 4: Where to Paint Outdoors
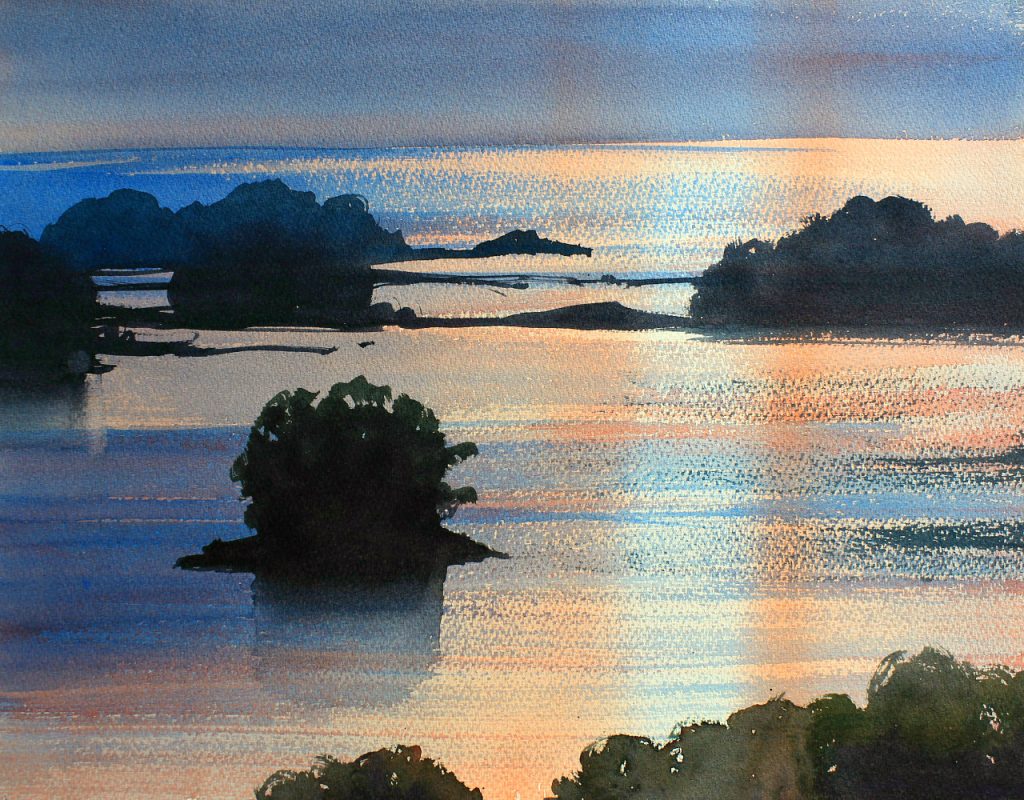
I give 6 suggestions on where to find good places to paint outdoors. And I include a lot of paintings of city scenes and also a beautiful place called Sasebo that has over 200 islands.
Part 5: Considerations before Painting an Outdoor Scene
Advice on how to best prepare for painting a scene including considering viewpoint, doing rough sketches to know you have good composition, problems of time, weather, people and cars. And finally the problems you might have different terrains such as mountains, rivers, the seaside and farms.
Part 6: When to paint outdoors
Coming one day!
Gareth.
Leave a Reply
You must be logged in to post a comment.